"dmp_native_support" parameter is required to turn on in order for the DMP to provide Linux LVM VG multipathing.
# vxdmpadm settune dmp_native_support=on
# vxdmpadm gettune |grep support
dmp_native_support on off
# lvmdiskscan |grep emc |grep LVM
/dev/vx/dmp/emc_clariion0_1000 [ 15.00 GB] LVM physical volume
/dev/vx/dmp/emc0_05ff [ 1.01 GB] LVM physical volume
/dev/vx/dmp/emc0_05fe [ 1.01 GB] LVM physical volume
/dev/vx/dmp/emc0_05fd [ 1.01 GB] LVM physical volu
Showing posts with label VCS. Show all posts
Showing posts with label VCS. Show all posts
Thursday, September 29, 2011

Tuesday, September 27, 2011
Verify key registration for Veritas disks
Sometime there are disks SCSI3-PR compliance or vxfentsthdw script failure for vxfencing. Excute below to verify the keys on all disks.
Command to check all the keys and SCSI-3 PR compliance disks for VCS
vxdisk list|grep emc0 |awk '{print "/dev/vx/rdmp/"$1}' > /tmp/disks
vxdisk list|grep emc0 |awk '{print "/dev/vx/dmp/"$1}' > /tmp/disks - (Try with dmp path only if rdmp fails)
vxfenadm -a -k 1 -f /tmp/disks - register key 1 to the all the disks
vxfenadm -g all -f /tmp/disks - list the key register
vxfenadm -s all -f /tmp/disks - clear the key
Eg. Command to query registeration keys in coordinator diskgroup
host85-root>vxdisk -o alldgs list |grep vxfencoorddg |awk '{print "/dev/vx/rdmp/"$1}' > /tmp/disks
host85-root>vxfenadm -s all -f /tmp/disks
Device Name: /dev/vx/rdmp/pp_emc0_4
Total Number Of Keys: 3
key[0]:
[Numeric Format]: 86,70,68,67,55,65,48,48
[Character Format]: VFDC7A00
* [Node Format]: Cluster ID: 56442 Node ID: 0 Node Name: host85
key[1]:
[Numeric Format]: 86,70,68,67,55,65,48,49
[Character Format]: VFDC7A01
* [Node Format]: Cluster ID: 56442 Node ID: 1 Node Name: host83
key[2]:
[Numeric Format]: 86,70,68,67,55,65,48,50
[Character Format]: VFDC7A02
* [Node Format]: Cluster ID: 56442 Node ID: 2 Node Name: host81
Device Name: /dev/vx/rdmp/pp_emc0_6
Total Number Of Keys: 3
key[0]:
[Numeric Format]: 86,70,68,67,55,65,48,48
[Character Format]: VFDC7A00
* [Node Format]: Cluster ID: 56442 Node ID: 0 Node Name: host85
key[1]:
[Numeric Format]: 86,70,68,67,55,65,48,49
[Character Format]: VFDC7A01
* [Node Format]: Cluster ID: 56442 Node ID: 1 Node Name: host83
key[2]:
[Numeric Format]: 86,70,68,67,55,65,48,50
[Character Format]: VFDC7A02
* [Node Format]: Cluster ID: 56442 Node ID: 2 Node Name: host81
Device Name: /dev/vx/rdmp/pp_emc0_5
Total Number Of Keys: 3
key[0]:
[Numeric Format]: 86,70,68,67,55,65,48,48
[Character Format]: VFDC7A00
* [Node Format]: Cluster ID: 56442 Node ID: 0 Node Name: host85
key[1]:
[Numeric Format]: 86,70,68,67,55,65,48,49
[Character Format]: VFDC7A01
* [Node Format]: Cluster ID: 56442 Node ID: 1 Node Name: host83
key[2]:
[Numeric Format]: 86,70,68,67,55,65,48,50
[Character Format]: VFDC7A02
* [Node Format]: Cluster ID: 56442 Node ID: 2 Node Name: host81
Command to check all the keys and SCSI-3 PR compliance disks for VCS
vxdisk list|grep emc0 |awk '{print "/dev/vx/rdmp/"$1}' > /tmp/disks
vxdisk list|grep emc0 |awk '{print "/dev/vx/dmp/"$1}' > /tmp/disks - (Try with dmp path only if rdmp fails)
vxfenadm -a -k 1 -f /tmp/disks - register key 1 to the all the disks
vxfenadm -g all -f /tmp/disks - list the key register
vxfenadm -s all -f /tmp/disks - clear the key
Eg. Command to query registeration keys in coordinator diskgroup
host85-root>vxdisk -o alldgs list |grep vxfencoorddg |awk '{print "/dev/vx/rdmp/"$1}' > /tmp/disks
host85-root>vxfenadm -s all -f /tmp/disks
Device Name: /dev/vx/rdmp/pp_emc0_4
Total Number Of Keys: 3
key[0]:
[Numeric Format]: 86,70,68,67,55,65,48,48
[Character Format]: VFDC7A00
* [Node Format]: Cluster ID: 56442 Node ID: 0 Node Name: host85
key[1]:
[Numeric Format]: 86,70,68,67,55,65,48,49
[Character Format]: VFDC7A01
* [Node Format]: Cluster ID: 56442 Node ID: 1 Node Name: host83
key[2]:
[Numeric Format]: 86,70,68,67,55,65,48,50
[Character Format]: VFDC7A02
* [Node Format]: Cluster ID: 56442 Node ID: 2 Node Name: host81
Device Name: /dev/vx/rdmp/pp_emc0_6
Total Number Of Keys: 3
key[0]:
[Numeric Format]: 86,70,68,67,55,65,48,48
[Character Format]: VFDC7A00
* [Node Format]: Cluster ID: 56442 Node ID: 0 Node Name: host85
key[1]:
[Numeric Format]: 86,70,68,67,55,65,48,49
[Character Format]: VFDC7A01
* [Node Format]: Cluster ID: 56442 Node ID: 1 Node Name: host83
key[2]:
[Numeric Format]: 86,70,68,67,55,65,48,50
[Character Format]: VFDC7A02
* [Node Format]: Cluster ID: 56442 Node ID: 2 Node Name: host81
Device Name: /dev/vx/rdmp/pp_emc0_5
Total Number Of Keys: 3
key[0]:
[Numeric Format]: 86,70,68,67,55,65,48,48
[Character Format]: VFDC7A00
* [Node Format]: Cluster ID: 56442 Node ID: 0 Node Name: host85
key[1]:
[Numeric Format]: 86,70,68,67,55,65,48,49
[Character Format]: VFDC7A01
* [Node Format]: Cluster ID: 56442 Node ID: 1 Node Name: host83
key[2]:
[Numeric Format]: 86,70,68,67,55,65,48,50
[Character Format]: VFDC7A02
* [Node Format]: Cluster ID: 56442 Node ID: 2 Node Name: host81
Thursday, September 22, 2011
VCS ASM/Oracle agent for single oracle database instance with ASM
Steps to allow VCS Oracle Agent to manage Single Oracle Database Instance with ASM:
2. Oracle ASM and Database single instance setup
2.1 Select and Install Grid Infrastructure Software only and execute below for standalone server. (1st and subsequent nodes)
/u01/app/11.2.0/grid/perl/bin/perl -I/u01/app/11.2.0/grid/perl/lib -I/u01/app/11.2.0/grid/crs/install /u01/app/11.2.0/grid/crs/install/roothas.pl2.2 Configure Oracle ASM with “asmca”. (1st node only)
2.3 Select and Install Oracle Database Software only (1st and subsequent nodes)
2.4 Configure listener with “netca” (1st and subsequent nodes)
2.5 Configure Oracle DB with “dbca” (1st node only)
2.6 Create ASM and add ASM on remote host (subsequent nodes)
1st node (host85)
host85-oracle>export ORACLE_SID=+ASM
host85-oracle>export ORACLE_HOME=/u01/app/11.2.0/grid
host85-oracle>asmcmd
ASMCMD> ls
REGISTRY.253.762436131
ASMCMD> spget +DATA/asm/ASMPARAMETERFILE/REGISTRY.253.762436131
+DATA/asm/asmparameterfile/registry.253.762436131
ASMCMD> spcopy +DATA/asm/ASMPARAMETERFILE/REGISTRY.253.762436131 /u01/app/11.2.0/grid/dbs/spfileASM.ora
2nd node (host83) and subsequent nodes (grid owner)
host85-oracle>crsctl stop resource ora.asm –f
host85-oracle>scp -p spfileASM.ora 10.10.10.83:/u01/app/11.2.0/grid/dbs
host83-oracle>srvctl add asm -l LISTENER –p\ /u01/app/11.2.0/grid/dbs/spfileASM.ora -d '/dev/rdisk/*'
host83-oracle>crsctl start resource ora.cssd
host83-oracle>crsctl start resource ora.asm
host83-oracle>export ORACLE_SID=+ASM
host83-oracle>export ORACLE_HOME=/u01/app/11.2.0/grid
host83-oracle>sqlplus / as sysasm
SQL> alter diskgroup DATA mount;
host83-oracle>crsctl status resource –t (Output display register ASM DG show in RED)
--------------------------------------------------------------------------------
NAME
--------------------------------------------------------------------------------
Local Resources
--------------------------------------------------------------------------------
ora.DATA.dg
ONLINE ONLINE host83
ora.LISTENER.lsnr
ONLINE ONLINE host83
ora.asm
ONLINE ONLINE host83 Started
ora.ons
OFFLINE OFFLINE host83
--------------------------------------------------------------------------------
Cluster Resources
--------------------------------------------------------------------------------
ora.cssd
1 ONLINE ONLINE host83
ora.diskmon
1 ONLINE ONLINE host83
ora.evmd
1 ONLINE ONLINE host83
2.7 Enable Oracle Cluster Synchronization Service daemon to start automatically (1st and subsequent nodes)
host85-oracle>srvctl disable asmhost85-oracle>crsctl modify resource ora.asm -attr ENABLED=0
host85-oracle>crsctl modify resource ora.cssd -attr AUTO_START=always
2.8 Setting MLOCK priviledge for DBA user (1st and subsequent nodes)
host85-root>setprivgrp dba MLOCKhost85-root>echo "dba MLOCK" > /etc/privgroup
host85-root>/usr/bin/getprivgrp dba
2.9 Copy the $ORACLE_BASE/admin/SID (from 1st node to subsequent nodes)
host85-root>pwd/u01/app/oracle/admin
host85-root>tar xvf - HPUX | ssh 10.10.10.83 "cd /u01/app/oracle/admin; tar \ xvf - "
2.10 Copy the $ORACLE/dbs (from 1st node to subsequent nodes)
host85-root>pwd/u01/app/oracle/product/11.2.0/dbhome_1
host85-root>tar cvf - dbs | ssh 10.10.10.81 "cd /u01/app/oracle/product/11.2.0/dbhome_1; tar xvf -"
3 VCS ASM and VCS Service Group configuration
This diagram shows all VCS service groups and their resource types as well as their interlink relationship.
3.1 Setup ASM Instance Service group and add ASM Instance Resource type in the group.
hagrp -add asminstgrphagrp -modify asminstgrp SystemList host85 0 host83 1 host81 2
hagrp -modify asminstgrp AutoStartList host85 host83 host81
hagrp -modify asminstgrp Parallel 1
hares -add ASM_asminst ASMInst asminstgrp
hares -modify ASM_asminst Critical 1
hares -modify ASM_asminst MonitorOption 0
hares -modify ASM_asminst Sid +ASM
hares -modify ASM_asminst Owner oracle
hares -modify ASM_asminst Home /u01/app/11.2.0/grid
hares -modify ASM_asminst DBAUser
hares -modify ASM_asminst DBAPword
hares -modify ASM_asminst Pfile
hares -modify ASM_asminst StartUpOpt
hares -modify ASM_asminst ShutDownOpt
hares -modify ASM_asminst EnvFile
hares -modify ASM_asminst Encoding
hares -modify ASM_asminst Enabled 1
3.2 Setup oraasm_group service group for single Oracle DB and ASM instance. ASMDG, IP, NIC and Netlsnr resource type will be add into this service group. Oracle resource type also require if Oracle DB is configure.
hagrp -add oraasm_grp
hagrp -modify oraasm_grp SystemList host85 0 host83 1 host81 2
hagrp -modify oraasm_grp AutoStartList host85
hagrp -modify oraasm_grp Parallel 0
hares -add ASM_asmdg ASMDG oraasm_grp
hares -modify ASM_asmdg Critical 1
hares -modify ASM_asmdg Sid +ASM
hares -modify ASM_asmdg Owner oracle
hares -modify ASM_asmdg Home /u01/app/11.2.0/grid
hares -modify ASM_asmdg DBAUser
hares -modify ASM_asmdg DBAPword
hares -modify ASM_asmdg DiskGroups DATA
hares -modify ASM_asmdg EnvFile
hares -modify ASM_asmdg Encoding
hares -modify ASM_asmdg Enabled 1
hares -add IP_oraprod IP oraasm_grp
hares -modify IP_oraprod Critical 1
hares -modify IP_oraprod ArpDelay 1
hares -modify IP_oraprod IfconfigTwice 0
hares -modify IP_oraprod PrefixLen 0
hares -modify IP_oraprod Device lan2
hares -modify IP_oraprod Address 10.10.10.146
hares -modify IP_oraprod NetMask 255.255.252.0
hares -modify IP_oraprod Options
hares -modify IP_oraprod RouteOptions
hares -modify IP_oraprod Enabled 1
hares -add NIC_oraprod NIC oraasm_grp
hares -modify NIC_oraprod Critical 1
hares -modify NIC_oraprod NetworkType ether
hares -modify NIC_oraprod PingOptimize 1
hares -modify NIC_oraprod Protocol IPv4
hares -modify NIC_oraprod Device lan2
hares -modify NIC_oraprod NetworkHosts host85 host83 host81
hares -modify NIC_oraprod Enabled 1
hares -add LSNR_oraprod_lsnr Netlsnr oraasm_grp
hares -modify LSNR_oraprod_lsnr Critical 1
hares -modify LSNR_oraprod_lsnr Listener LISTENER
hares -modify LSNR_oraprod_lsnr MonScript ./bin/Netlsnr/LsnrTest.pl
hares -modify LSNR_oraprod_lsnr Owner oracle
hares -modify LSNR_oraprod_lsnr Home /u01/app/11.2.0/grid
hares -modify LSNR_oraprod_lsnr TnsAdmin /u01/app/11.2.0/grid/admin
hares -modify LSNR_oraprod_lsnr EnvFile
hares -modify LSNR_oraprod_lsnr LsnrPwd
hares -modify LSNR_oraprod_lsnr Encoding
hares -modify LSNR_oraprod_lsnr Enabled 1
ares -add ORA_oraprod Oracle oraasm_grp
hares -modify ORA_oraprod Critical 1
hares -modify ORA_oraprod StartUpOpt STARTUP_FORCE
hares -modify ORA_oraprod ShutDownOpt IMMEDIATE
hares -modify ORA_oraprod AutoEndBkup 1
hares -modify ORA_oraprod MonScript ./bin/Oracle/SqlTest.pl
hares -modify ORA_oraprod MonitorOption 0
hares -modify ORA_oraprod ManagedBy ADMIN
hares -modify ORA_oraprod Sid HPUX
hares -modify ORA_oraprod Owner oracle
hares -modify ORA_oraprod Home /u01/app/oracle/product/11.2.0/dbhome_1
hares -modify ORA_oraprod Pfile
hares -modify ORA_oraprod DBAUser system
hares -modify ORA_oraprod DBAPword ameMbmOmhMfoCmpOfoD
hares -modify ORA_oraprod EnvFile
hares -modify ORA_oraprod User
hares -modify ORA_oraprod Pword
hares -modify ORA_oraprod Table
hares -modify ORA_oraprod Encoding
hares -modify ORA_oraprod DBName
hares -modify ORA_oraprod Enabled 1
Add below in main.cf to create the link relationship:
requires group asminstgrp online local firm
IP_oraprod requires NIC_oraprod
LSNR_oraprod_lsnr requires IP_oraprod
LSNR_oraprod_lsnr requires ORA_oraprod
ORA_oraprod requires ASM_asmdg
Sample main.cf
host81-root>cat /etc/VRTSvcs/conf/config/main.cf
include "OracleASMTypes.cf"
include "types.cf"
include "CFSTypes.cf"
include "CRSResource.cf"
include "CVMTypes.cf"
include "Db2udbTypes.cf"
include "MultiPrivNIC.cf"
include "OracleTypes.cf"
include "PrivNIC.cf"
include "SybaseTypes.cf"
cluster hp818385 (
UserNames = { admin = hqrJqlQnrMrrPzrLqo }
Administrators = { admin }
UseFence = SCSI3
HacliUserLevel = COMMANDROOT
)
system host81 (
)
system host83 (
)
system host85 (
)
group asminstgrp (
SystemList = { host85 = 0, host83 = 1, host81 = 2 }
Parallel = 1
AutoStartList = { host85, host83, host81 }
)
ASMInst ASM_asminst (
Sid = "+ASM"
Owner = oracle
Home = "/u01/app/11.2.0/grid"
)
// resource dependency tree
//
// group asminstgrp
// {
// ASMInst ASM_asminst
// }
group oraasm_grp (
SystemList = { host85 = 0, host83 = 1, host81 = 2 }
AutoStartList = { host85 }
)
ASMDG ASM_asmdg (
Sid = "+ASM"
Owner = oracle
Home = "/u01/app/11.2.0/grid"
DiskGroups = { DATA }
)
IP IP_oraprod (
Device = lan2
Address = "10.10.10.146"
NetMask = "255.255.252.0"
)
NIC NIC_oraprod (
Device = lan2
NetworkHosts = { "10.10.10.85", "10.10.10.83", "10.10.10.81" }
)
Netlsnr LSNR_oraprod_lsnr (
Owner = oracle
Home = "/u01/app/11.2.0/grid"
TnsAdmin = "/u01/app/11.2.0/grid/admin"
)
Oracle ORA_oraprod (
Sid = HPUX
Owner = oracle
Home = "/u01/app/oracle/product/11.2.0/dbhome_1"
DBAUser = "system"
DBAPword = ameMbmOmhMfoCmpOfoD
)
requires group asminstgrp online local firm
IP_oraprod requires NIC_oraprod
LSNR_oraprod_lsnr requires IP_oraprod
LSNR_oraprod_lsnr requires ORA_oraprod
ORA_oraprod requires ASM_asmdg
// resource dependency tree
//
// group oraasm_grp
// {
// Netlsnr LSNR_oraprod_lsnr
// {
// IP IP_oraprod
// {
// NIC NIC_oraprod
// }
// Oracle ORA_oraprod
// {
// ASMDG ASM_asmdg
// }
// }
// }
Wednesday, September 21, 2011
LVM SG transition fails in all paths disabled in Linux
If all the paths to the disks have disabled, the LVM2 vg commands stop
responding and wait until at least one path to the disks is restored. As
Release Notes, it is a known issues.
LVMVolumeGroup agent uses LVM2 commands, this behavior causes online and offline entry points of LVMVolumeGroup agent to time out and clean EP stops responding for an indefinite time. Because of this, the service group cannot failover to another node.
Workaround: You need to restore at least one path.
Refer to this https://sort.symantec.com/public/documents/sfha/5.1sp1pr2/linux/productguides/pdf/vcs_notes_51sp1pr2_lin.pdf. page 43 for more detail.
Tuesday, September 20, 2011
Remove clone_disk flag on VxVM
When VxVM devices are shown as clone disk, below command allows the flag to be cleared.
Refer to http://www.symantec.com/business/support/index?page=content&id=TECH70049 for more detail.
# vxdisk list
DEVICE TYPE DISK GROUP STATUS
emcpoweraa auto:cdsdisk emcpowerq vmax_vcsdg online clone_disk
emcpowerab auto:cdsdisk emcpowerp vmax_vcsdg online clone_disk
# for i in `vxdisk list |grep clone_disk | awk '{print $1}'`; do echo $i; vxdisk set $i clone=off; done
# vxdisk list
DEVICE TYPE DISK GROUP STATUS
emcpoweraa auto:cdsdisk emcpowerq vmax_vcsdg online
emcpowerab auto:cdsdisk emcpowerp vmax_vcsdg online
Refer to http://www.symantec.com/business/support/index?page=content&id=TECH70049 for more detail.
# vxdisk list
DEVICE TYPE DISK GROUP STATUS
emcpoweraa auto:cdsdisk emcpowerq vmax_vcsdg online clone_disk
emcpowerab auto:cdsdisk emcpowerp vmax_vcsdg online clone_disk
# for i in `vxdisk list |grep clone_disk | awk '{print $1}'`; do echo $i; vxdisk set $i clone=off; done
# vxdisk list
DEVICE TYPE DISK GROUP STATUS
emcpoweraa auto:cdsdisk emcpowerq vmax_vcsdg online
emcpowerab auto:cdsdisk emcpowerp vmax_vcsdg online
Update VXVM&ASL/APM packages on Linux
Command to update VxVM ASL/APM.
# ls -l
total 19968
-rw-r--r-- 1 root root 158990 Sep 21 10:50 VRTSaslapm-5.0.000.000-internal_SLES11.x86_64.rpm
-rw-r--r-- 1 root root 20258631 Sep 21 10:50 VRTSvxvm-5.0.000.000-internal_SLES11.x86_64.rpm
# rpm -Uvh --force *.rpm --nodeps
Preparing... ########################################### [100%]
stopping vxconfigd
1:VRTSvxvm ########################################### [ 50%]
Installing file /etc/init.d/vxvm-boot
vxvm-boot 0:off 1:off 2:on 3:on 4:on 5:on 6:off
creating VxVM device nodes under /dev
Installing keys for APMs
2:VRTSaslapm ########################################### [100%]
Installing keys for APMs
#shutdown -r now
# ls -l
total 19968
-rw-r--r-- 1 root root 158990 Sep 21 10:50 VRTSaslapm-5.0.000.000-internal_SLES11.x86_64.rpm
-rw-r--r-- 1 root root 20258631 Sep 21 10:50 VRTSvxvm-5.0.000.000-internal_SLES11.x86_64.rpm
# rpm -Uvh --force *.rpm --nodeps
Preparing... ########################################### [100%]
stopping vxconfigd
1:VRTSvxvm ########################################### [ 50%]
Installing file /etc/init.d/vxvm-boot
vxvm-boot 0:off 1:off 2:on 3:on 4:on 5:on 6:off
creating VxVM device nodes under /dev
Installing keys for APMs
2:VRTSaslapm ########################################### [100%]
Installing keys for APMs
#shutdown -r now
Monday, September 12, 2011
Remove PowerPath failure with VxVM on AIX
If PowerPath devices are used by LVM/VxVM/VCS on AIX, it will fail to uninstall or upgrade PowerPath. Follow this workaround http://www.symantec.com/business/support/index?page=content&id=TECH68947 to resolve the problem.
Remove PowerPath failure with VxVM on Linux
PowerPath removal will fail when the underneath PowerPath devices are used by Veritas Volume Manager. Therefore, it is necessary to remove PowerPath devices from VxVM before removing the PowerPath package.
Steps to remove PowerPath with VxVM on Linux
1. for i in `vxdisk list | grep emcpower |awk '{print $1}'`;do vxdisk rm $i;done
3. #/etc/init.d/PowerPath stop
2. rpm -e EMCpower.LINUX-5.1.0-194
Refer to http://www.symantec.com/business/support/index?page=content&id=TECH70180 for more detail.
Steps to remove PowerPath with VxVM on Linux
1. for i in `vxdisk list | grep emcpower |awk '{print $1}'`;do vxdisk rm $i;done
3. #/etc/init.d/PowerPath stop
2. rpm -e EMCpower.LINUX-5.1.0-194
Refer to http://www.symantec.com/business/support/index?page=content&id=TECH70180 for more detail.
Monday, September 5, 2011
AIX VCS LVMVG SG Creation
This example shows the steps to allow the DMP to use as multipathing software for VCS LVMVG SG on AIX.
Step 1: Ensure Enclosure Based Name (EBN) name is used and dmp_native_support is ON
vxddladm get namingscheme
vxddladm set namingscheme=ebn [persistence={yes|no}] [use_avid=yes|no] [lowercase=yes|no]
vxdmpadm gettune |grep dmp_native_support
vxdmpadm settune dmp_native_support=on
Step 2: Remove device from from VxVm and create LVM VG on node1
vxdisk rm emc0_25
chpv -C emc0_25 (clear PVID if any)
mkvg -f -y vmaxlvmvg emc0_25
mklv -t jfs2log vmaxlvmvg 1
mkfs -o log=/dev/loglv01 -V jfs2 /dev/vmax_lvm
mklv -t jfs2 -y vmaxlvmlv vmaxlvmvg 1G
crfs -v jfs -m <mount point> -d <logical volume>
lspv |grep vmaxlvmvg (identify PVID)
Step3: set physical volume (pv) to the other node2
chdev -l emc1_25 -a pv=yes
lsattr -El emc1_25
Step 4: Export/Import VG on both cluster node
exportvg vmaxlvmvg (node1)
lvlstmajor
varyoffvg vmaxlvmvg
importvg -V major_number -y vmaxlvmvg emc0_25
varyoffvg vmaxlvmvg
lvlstmajor (node 2)
importvg -V major_number -y vmaxlvmvg emc1_25
varyoffvg vmaxlvmvg

If there's any problem bring online under VCS, refer to http://www.symantec.com/business/support/index?page=content&id=TECH70949 for troubeshooting.
Note: If third party driver (TDPmode) eg. PowerPath is used for multipathing. Step 1 can be skipped and PP pseudo name is normally used for VG creation, ie mkvg -y vmaxlvmvg hdiskpower25. Refer to http://sfdoccentral.symantec.com/sf/5.1SP1PR1/aix/pdf/dmp_admin_51sp1pr1_aix.pdf page 154 for more details.
Step 1: Ensure Enclosure Based Name (EBN) name is used and dmp_native_support is ON
vxddladm get namingscheme
vxddladm set namingscheme=ebn [persistence={yes|no}] [use_avid=yes|no] [lowercase=yes|no]
vxdmpadm gettune |grep dmp_native_support
vxdmpadm settune dmp_native_support=on
Step 2: Remove device from from VxVm and create LVM VG on node1
vxdisk rm emc0_25
chpv -C emc0_25 (clear PVID if any)
mkvg -f -y vmaxlvmvg emc0_25
mklv -t jfs2log vmaxlvmvg 1
mkfs -o log=/dev/loglv01 -V jfs2 /dev/vmax_lvm
mklv -t jfs2 -y vmaxlvmlv vmaxlvmvg 1G
crfs -v jfs -m <mount point> -d <logical volume>
lspv |grep vmaxlvmvg (identify PVID)
Step3: set physical volume (pv) to the other node2
chdev -l emc1_25 -a pv=yes
lsattr -El emc1_25
Step 4: Export/Import VG on both cluster node
exportvg vmaxlvmvg (node1)
lvlstmajor
varyoffvg vmaxlvmvg
importvg -V major_number -y vmaxlvmvg emc0_25
varyoffvg vmaxlvmvg
lvlstmajor (node 2)
importvg -V major_number -y vmaxlvmvg emc1_25
varyoffvg vmaxlvmvg

If there's any problem bring online under VCS, refer to http://www.symantec.com/business/support/index?page=content&id=TECH70949 for troubeshooting.
Note: If third party driver (TDPmode) eg. PowerPath is used for multipathing. Step 1 can be skipped and PP pseudo name is normally used for VG creation, ie mkvg -y vmaxlvmvg hdiskpower25. Refer to http://sfdoccentral.symantec.com/sf/5.1SP1PR1/aix/pdf/dmp_admin_51sp1pr1_aix.pdf page 154 for more details.
VCS SG Linux LVM failure due to all paths disabled
There is a limitation on VCS LVMVolumeGroup agent and Linux LVM causing SG LVM SG cannot failover to other node when there's all path disabled on the active node. It is a known issue which is documented.
Refer to VCS release notes https://sort.symantec.com/public/documents/sfha/5.1sp1pr2/linux/productguides/pdf/vcs_notes_51sp1pr2_lin.pdf page 43 for more details.
Refer to VCS release notes https://sort.symantec.com/public/documents/sfha/5.1sp1pr2/linux/productguides/pdf/vcs_notes_51sp1pr2_lin.pdf page 43 for more details.
Thursday, September 1, 2011
Veritas DMP HP-UX native LVM configuration
HP-UX native LVM is supported with Veritas DMP for multipathing. dmp_native_support parameter must be turned on and Enclosure Base Name (EBN) scheming must be used in order for DMP to manage LVM.
#vxddladm get namingscheme
#vxddladm set namingscheme=ebn persistence=yes
#vxdmpadm gettune
#vxdmpadm settune dmp_native_support=on
#vxddladm get namingscheme
#vxddladm set namingscheme=ebn persistence=yes
#vxdmpadm gettune
#vxdmpadm settune dmp_native_support=on
On HP-UX 11.31 1003IC, the pvcreate Utility fails to create Physical
volumes with DMP devices. As a work around, use corresponding native multipathing (nMP metanode/OS path) to create physical volume using pvcreate Utility.
Instead of "pvcreate -f /dev/vx/dmp/emc_clariion0_1", "pvcreate -f /dev/rdisk/disk110" should be used.
Wednesday, August 31, 2011
Veritas Thin Reclamation on EMC Storage
Here is some simple steps to do thin reclamation with Veritas Volume Manager. That's provided that all the necessary environments have been done such as host/storage/vxvm.
Refer to VxVM version and Array firmware requirements.
Step 1: Ensure the device TYPE is thinrclm
#vxdisk -o thin list
DEVICE SIZE(mb) PHYS_ALLOC(mb) GROUP TYPE
emc_clariion0_63 102400 N/A CX_thin thinrclm
emc0_1766 1031 N/A VMAX_thin thinrclm
emc0_1767 1031 N/A VMAX_thin thinrclm
emc0_1768 1031 N/A VMAX_thin thinrclm
emc0_1760 1031 N/A VMAX_thin thinrclm
Step 2: Enable the dmp write log to syslog (if you want to view the log)
#vxdmpadm settune dmp_log_level=3
write_same with offset and length
Step 3: Perform Thin Reclamation via:
#vxdisk reclaim CX_thin
Reclaiming thin storage on:
Disk emc_clariion0_63 : Done.
#vxdisk reclaim VMAX_thin
Reclaiming thin storage on:
Disk emc0_1768 : Done.
Disk emc0_1769 : Done.
Disk emc0_1766 : Done.
Disk emc0_1767 : Done.
Refer to VxVM version and Array firmware requirements.
Step 1: Ensure the device TYPE is thinrclm
#vxdisk -o thin list
DEVICE SIZE(mb) PHYS_ALLOC(mb) GROUP TYPE
emc_clariion0_63 102400 N/A CX_thin thinrclm
emc0_1766 1031 N/A VMAX_thin thinrclm
emc0_1767 1031 N/A VMAX_thin thinrclm
emc0_1768 1031 N/A VMAX_thin thinrclm
emc0_1760 1031 N/A VMAX_thin thinrclm
Step 2: Enable the dmp write log to syslog (if you want to view the log)
#vxdmpadm settune dmp_log_level=3
write_same with offset and length
Step 3: Perform Thin Reclamation via:
#vxdisk reclaim CX_thin
Reclaiming thin storage on:
Disk emc_clariion0_63 : Done.
#vxdisk reclaim VMAX_thin
Reclaiming thin storage on:
Disk emc0_1768 : Done.
Disk emc0_1769 : Done.
Disk emc0_1766 : Done.
Disk emc0_1767 : Done.
VCS file system mount failure due to timeout
If there're many mount points under VCS control, increasing OnlineTimeout value for mount resource will prevent VCS mounting resource failure due to the time constraint during switch over or failover. Refer to Modifying mount resource attributes for more detail.
The commands are:
Error grabbed from engine_A.log
2010/08/10 15:21:24 VCS INFO V-16-2-13078 (node2) Resource(vcsfs1) - clean completed successfully after 1 failed attempts.
2010/08/10 15:21:24 VCS INFO V-16-2-13071 (node2) Resource(vcsfs1): reached OnlineRetryLimit(0).
2010/08/10 15:21:24 VCS ERROR V-16-1-10303 Resource vcsfs1 (Owner: Unspecified, Group: vcs) is FAULTED (timed out) on sys node2
The commands are:
/opt/VRTS/bin/haconf -makerw
/opt/VRTS/bin/hatype -modify Mount OnlineTimeout 600
/opt/VRTS/bin/haconf –dump
Error grabbed from engine_A.log
2010/08/10 15:21:24 VCS INFO V-16-2-13078 (node2) Resource(vcsfs1) - clean completed successfully after 1 failed attempts.
2010/08/10 15:21:24 VCS INFO V-16-2-13071 (node2) Resource(vcsfs1): reached OnlineRetryLimit(0).
2010/08/10 15:21:24 VCS ERROR V-16-1-10303 Resource vcsfs1 (Owner: Unspecified, Group: vcs) is FAULTED (timed out) on sys node2
VCS fails to go running state on HP-UX 11.31 fusion
VCS fails to go to the running state on HP-UX 11.31 with March 2011 release
Due to a regression caused by the patch PHKL_41700 (QXCR1001078659) that went into HP-UX 11.31 March 2011 release, the select() call takes long time to return from 'timeout sleep'. Due to this, _had misses the heartbeat with GAB resulting in SIGABRT by GAB. [2287383]
Workaround: You must tune 'hires_timeout_enable' kernel parameter to 1 before starting the cluster. Run the following command to set this variable to 1:
# kctune hires_timeout_enable=1
Refer to VCS fails to go to the running state on HP-UX 11.31 with March 2011 release for detail
VCS Linux LVM Resource using PowerPath as third party driver multipathing
If PowerPath is being used as multipathing software for VCS LVMVolumeGroup Resource, PowerPath Pseudo name must be used for PV creation and native OS path name must be filtered for LVM as shown in RED below. Otherwise, LVM will not failover properly for device path failure causing VCS LVM Service Group failing as well.
# more /etc/lvm/lvm.conf |grep filter |grep -v "#"
filter = [ "r|^/dev/(sda)[0-9]*$|", "r|^/dev/(sda)[a-z]*$|", "r|^/dev/(sdc)[a-z]*$|", "r|/dev/vx/dmp/.*|", "r|/dev/block/.*|", "r|/dev/VxDMP.*|", "r|/dev/vx/dmpconfig|", "r|/dev/vx/rdmp/.*|", "r|/dev/dm-[0-9]*|", "r|/dev/mpath/mpath[0-9]*|", "r|/dev/mapper/mpath[0-9]*|", "r|/dev/disk/.*|","r|/dev/.*/by-path/.*|", "r|/dev/.*/by-id/.*|", "a/.*/" ]
# powermt display dev=emcpowerar |egrep "sda|sdc"
6 qla2xxx sdaf FA 8fB active alive 0 0
5 qla2xxx sdcb FA 7fB active alive 0 0
# powermt display dev=emcpoweras |egrep "sda|sdc"
6 qla2xxx sdae FA 8fB active alive 0 0
5 qla2xxx sdca FA 7fB active alive 0 0
# powermt display dev=emcpoweraq |egrep "sda|sdc"
6 qla2xxx sdag FA 8fB active alive 0 0
5 qla2xxx sdcc FA 7fB active alive 0 0
#vgdispay -v vmax
--- Volume group ---
VG Name vmax
System ID
Format lvm2
Metadata Areas 3
Metadata Sequence No 58
VG Access read/write
VG Status resizable
MAX LV 0
Cur LV 1
Open LV 0
Max PV 0
Cur PV 3
Act PV 3
VG Size 3.01 GB
PE Size 4.00 MB
Total PE 771
Alloc PE / Size 700 / 2.73 GB
Free PE / Size 71 / 284.00 MB
VG UUID buYhkI-iIHB-ppPr-sgar-DlI8-6KeK-bweUd0
--- Logical volume ---
LV Name /dev/vmax/vmaxvol
VG Name vmax
LV UUID ip0WHa-nCgP-wNbe-61yT-3T7d-LHoq-aVTLod
LV Write Access read/write
LV Status available
# open 0
LV Size 2.73 GB
Current LE 700
Segments 3
Allocation inherit
Read ahead sectors auto
- currently set to 1024
Block device 253:0
--- Physical volumes ---
PV Name /dev/emcpoweraq
PV UUID xFoNsX-47n2-mBeL-UkxM-iZ5p-lIcw-xJndJV
PV Status allocatable
Total PE / Free PE 257 / 0
PV Name /dev/sdcb (improper LVM filtering)
PV UUID UV5ip7-T73S-Hbnp-w6bM-CrIs-7tYj-ti5g9C
PV Status allocatable
Total PE / Free PE 257 / 0
PV Name /dev/sdca (improper LVM filtering)
PV UUID lsYJmT-Etak-Gz27-9yG1-Hzxv-EP7T-G48ZyJ
PV Status allocatable
Total PE / Free PE 257 / 71
# vgscan
Reading all physical volumes. This may take a while...
Found duplicate PV 7WcanQm06zYfK0TdUPo7ABQy0cR4AHRN: using /dev/emcpowerar not /dev/vx/dmp/pp_emc0_9
Found duplicate PV P3gU7FTqwVpOzGmep2cf2yILcqxFlvHX: using /dev/emcpoweras not /dev/vx/dmp/pp_emc0_8
Found duplicate PV BRnJgGZrMwliZFSmnCDOgH54HCIaIXKX: using /dev/vx/dmp/pp_emc0_10 not /dev/emcpoweraq (improper LVM filtering)
Found volume group "vmax" using metadata type lvm2
# more /etc/lvm/lvm.conf |grep filter |grep -v "#"
filter = [ "r|^/dev/(sda)[0-9]*$|", "r|^/dev/(sda)[a-z]*$|", "r|^/dev/(sdc)[a-z]*$|", "r|/dev/vx/dmp/.*|", "r|/dev/block/.*|", "r|/dev/VxDMP.*|", "r|/dev/vx/dmpconfig|", "r|/dev/vx/rdmp/.*|", "r|/dev/dm-[0-9]*|", "r|/dev/mpath/mpath[0-9]*|", "r|/dev/mapper/mpath[0-9]*|", "r|/dev/disk/.*|","r|/dev/.*/by-path/.*|", "r|/dev/.*/by-id/.*|", "a/.*/" ]
# powermt display dev=emcpowerar |egrep "sda|sdc"
6 qla2xxx sdaf FA 8fB active alive 0 0
5 qla2xxx sdcb FA 7fB active alive 0 0
# powermt display dev=emcpoweras |egrep "sda|sdc"
6 qla2xxx sdae FA 8fB active alive 0 0
5 qla2xxx sdca FA 7fB active alive 0 0
# powermt display dev=emcpoweraq |egrep "sda|sdc"
6 qla2xxx sdag FA 8fB active alive 0 0
5 qla2xxx sdcc FA 7fB active alive 0 0
#vgdispay -v vmax
--- Volume group ---
VG Name vmax
System ID
Format lvm2
Metadata Areas 3
Metadata Sequence No 58
VG Access read/write
VG Status resizable
MAX LV 0
Cur LV 1
Open LV 0
Max PV 0
Cur PV 3
Act PV 3
VG Size 3.01 GB
PE Size 4.00 MB
Total PE 771
Alloc PE / Size 700 / 2.73 GB
Free PE / Size 71 / 284.00 MB
VG UUID buYhkI-iIHB-ppPr-sgar-DlI8-6KeK-bweUd0
--- Logical volume ---
LV Name /dev/vmax/vmaxvol
VG Name vmax
LV UUID ip0WHa-nCgP-wNbe-61yT-3T7d-LHoq-aVTLod
LV Write Access read/write
LV Status available
# open 0
LV Size 2.73 GB
Current LE 700
Segments 3
Allocation inherit
Read ahead sectors auto
- currently set to 1024
Block device 253:0
--- Physical volumes ---
PV Name /dev/emcpoweraq
PV UUID xFoNsX-47n2-mBeL-UkxM-iZ5p-lIcw-xJndJV
PV Status allocatable
Total PE / Free PE 257 / 0
PV Name /dev/sdcb (improper LVM filtering)
PV UUID UV5ip7-T73S-Hbnp-w6bM-CrIs-7tYj-ti5g9C
PV Status allocatable
Total PE / Free PE 257 / 0
PV Name /dev/sdca (improper LVM filtering)
PV UUID lsYJmT-Etak-Gz27-9yG1-Hzxv-EP7T-G48ZyJ
PV Status allocatable
Total PE / Free PE 257 / 71
# vgscan
Reading all physical volumes. This may take a while...
Found duplicate PV 7WcanQm06zYfK0TdUPo7ABQy0cR4AHRN: using /dev/emcpowerar not /dev/vx/dmp/pp_emc0_9
Found duplicate PV P3gU7FTqwVpOzGmep2cf2yILcqxFlvHX: using /dev/emcpoweras not /dev/vx/dmp/pp_emc0_8
Found duplicate PV BRnJgGZrMwliZFSmnCDOgH54HCIaIXKX: using /dev/vx/dmp/pp_emc0_10 not /dev/emcpoweraq (improper LVM filtering)
Found volume group "vmax" using metadata type lvm2
VCS HP-UX Native LVM Service Group goes into partial state
VCS HP-UX LVM will automatically import the VG and start the LVM volume. VCS will encounter problem and unable to manage the LVM Service Group if it VG/LVM volume is already imported and started respectively. Therefore, AUTO_VG_ACTIVATE must be set to 0 in /etc/lvmrc to prevent the OS from bringing up VG.
Refer to Volume group can cause concurrency violation under VCS control for more detail.
Refer to Volume group can cause concurrency violation under VCS control for more detail.
VCS Linux Native LVM Service Group goes into partial state
VCS Linux LVM Service Group will go into partial state once all the cluster nodes are rebooted. Linux LVM will auto-import VG and start the LVM volumes. "EnableLVMTagging" option must be enabled to allow VCS to manage LVM.
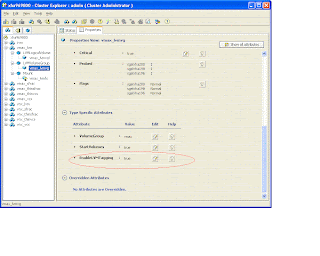
Refer to New and modified attributes for 5.1 SP1 agents for this new attribute information.
LVMVolumeGroup lvmvg (
VolumeGroup = VG
EnableLVMTagging = 1
StartVolumes = 1
)

Refer to New and modified attributes for 5.1 SP1 agents for this new attribute information.
Subscribe to:
Posts (Atom)